Now the we have closed Legally Blonde, I can actually say that programming over 340 cues for a 2 hour show wasn’t too bad. Many of the cues were what I call a “Snap and restore” which means that we’ll be in a look and something will pop up (like a light bulb moment” and then go back to the regular look. I’d say half of my cues were for these kinds of situations.
The best part about closing this show is that my load out was done in less than 45 minutes.
For those programming major shows that are cue-heavy, I highly recommend using magic sheets to make programming that much quicker. For Hog they are called “Plots” and for MA it is “Layout View” The Magic Sheet I use is an augmented graphical layout. I will put all of the “like” fixtures together in a layout that would match where they are in the plot. Then I have buttons for every color, intensity and beam attribute for easier programming.
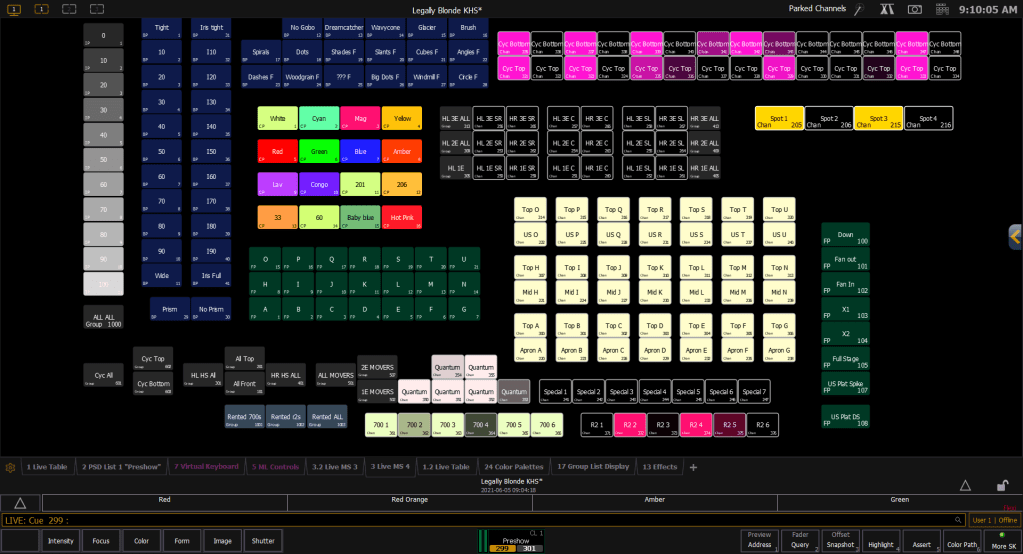
Starting on the left I have Intensity broken down by 10% increments. This saves me a lot of time trying to use the flywheel or entering in a percentage on the keypad by being able to just click and adjust as needed.
All of the Blue buttons are Beam attributes. So gobos, zoom, iris, and prism.
Next to that is the colors I most frequently use. I ended up adding a few for specific looks, but since they were a one time thing, I did not include them on the magic sheet.
Below the color is my positions. I set up “focus areas” on the stage based on the plot they had in the venue. I labelled them as Letters because I already have a ton of numbers to remember and recall, so letters makes that easier. You’ll also see on the right side I added some focus palettes for looks I added after the fact and used a couple of times in the show. They are way over there because I was just a little too lazy to move everything around.
Everything else on the Magic Sheet is a fixture or a group of fixtures. The grid of buttons in all white are the front and top lights for the stage all laid out in their 7 wide by 3 deep configuration. For quick programming or editing on the fly, I was able to grab the lights I needed and adjust them as needed. This is super useful for when you show up to a rehearsal and find that they had to re-block a scene to the other side of the stage for other logistical things like the fact that an actor in high heels can’t run all the way around the back of the stage in under 5 seconds. I was able to grab the lights where they were, and use the “Copy To” function to copy a light that was previously being used to the new set of lights. 2-3 clicks and 2 keystrokes to do what would have been 3-5 minutes of typing and looking through notes to see what color palette and intensity palette I used.
Of course everything is labelled so if I was sitting in the audience during a rehearsal I could call up to my board operator to fix some looks without having to explain where to find all of the information.
Not shown on the screen is the Start up and Shutdown Macros I created for my Board Op to turn the rig on and shut it down without having to enter a ton of numbers. I placed them off the screen just in case they accidentally bumped one of them and shut the entire rig down mid-show (speaking from experience. Luckily not this show.
